Upgrading your home’s exterior cladding is one of the highest-impact renovations you can tackle. It transforms curb appeal while protecting your framing from wind-driven rain, snow, and sub-zero cold snaps. Yet even the most durable siding on the market will buckle, trap moisture, or void its manufacturer’s warranty if installed carelessly. Across Canada, where extreme freeze-thaw cycles punish shortcuts, the installer you choose matters just as much as the material itself.
Before signing a contract or handing over a deposit, taking time to vet local pros protects both your home and your wallet. You might already be noticing signs your house needs new siding, such as warped panels, rising winter heating bills, or soft spots along lower walls. Or perhaps you are simply updating an aging facade before listing with a real estate agent. Either way, asking the right questions separates true exterior specialists from general handymen.
The Quick Edit
- Verify Credentials First: Always confirm active general liability insurance, provincial workers’ compensation coverage (WSIB or WCB), and brand-specific manufacturer certifications.
- Check Cold-Climate Methods: Ensure your contractor installs a proper weather-resistive barrier, rainscreen drainage gap, and thermal expansion clearances suited for Canadian temperature swings.
- Get Everything in Writing: Demand an itemized quote detailing tear-off, disposal, trim work, flashing, and separate manufacturer and workmanship warranties.
1. Are You Licensed, Insured, and Covered by Provincial Workers’ Compensation?
Exterior siding work involves scaffolding, ladders, power saws, and heavy material handling high off the ground. Among the most important things to know before starting a siding project is that verifying proper insurance coverage must come before discussing colours or timelines. Ask every prospective contractor for current proof of active protection. You want to see at least $2 million in commercial general liability insurance to safeguard your property against accidental damage during tear-off or installation.
Just as importantly, verify their provincial workers’ compensation status through WSIB, WCB, or CNESST depending on your province. If an uninsured worker gets injured on your driveway or roof edge, you, as the property owner, can be held financially liable. Always ask the contractor to email certificates directly from their insurance broker or provincial board rather than relying on photocopies carried in a truck.
2. Which Siding Brands Are You Certified to Install?
Modern cladding materials—including fibre cement, engineered wood, insulated vinyl, and architectural steel—each come with strict installation requirements. Manufacturer warranties often become completely void if nails are over-driven, butt joints lack proper flashing, or panels are pinned too tightly to expand in summer heat.
Leading manufacturers run formal training programs, such as the James Hardie Contractor Alliance or LP SmartSide BuildSmart, to ensure crews follow exact specifications. Hiring a certified installer confirms their team knows the precise fastener spacing and corrosion-resistant nail types required for high-wind zones. They also understand proper clearance heights above roof flashing, concrete walkways, and soil lines to prevent moisture wicking, as well as factory-approved cutting techniques that prevent premature surface chipping in the siding along exposed edges.
3. How Do You Prepare the Wall Assembly and Manage Moisture?
A great-looking exterior means very little if bulk rainwater or indoor vapour gets trapped behind the panels. In Canadian climates, building codes increasingly emphasize rainscreen wall assemblies. These systems allow walls to drain and dry quickly after heavy storms.
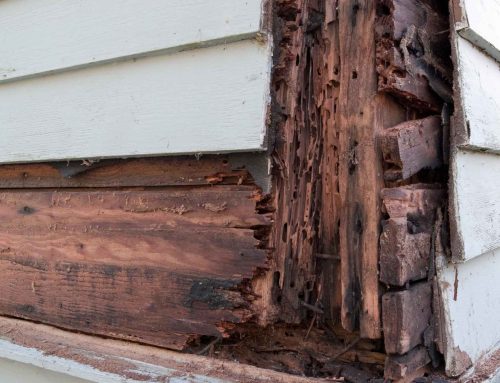
Ask your contractor how they handle what goes underneath the new cladding. A full tear-off down to the wall sheathing is almost always safer than nailing new siding over tired old layers. Stripping the old material lets the crew inspect for hidden wood rot. From there, confirm they will install a taped weather-resistive barrier, self-adhered window and door flashing membranes, and metal Z-flashing above horizontal trim boards. Creating a dedicated drainage gap behind the cladding ensures trapped moisture escapes downward and evaporates. This prevents water from soaking into your plywood sheathing.
4. How Do You Account for Extreme Temperature Expansion and Contraction?
Canadian exteriors routinely swing from -30°C in January to +32°C in July. Vinyl, aluminum, and engineered wood all expand in summer heat and shrink in winter cold, placing constant movement stress on fasteners and trim joints.
If a crew nails vinyl siding tightly against the wall or butts engineered wood planks flush together with zero breathing room, the panels will warp, buckle, or crack as soon as temperatures shift. Ask the contractor directly how they set nailing tolerances for your specific material. On vinyl siding, installers should leave a dime-width gap beneath nail heads so panels hang and slide freely, while engineered wood and fibre cement require manufacturer-specified expansion gaps and proper joint flashing.
5. What Is Included—and Excluded—in Your Written Estimate?
Vague one-line estimates create expensive surprises once scaffolding goes up around your home. When planning a realistic budget for a siding project, comparing itemized quotes helps you see exactly what you are paying for and prevents hidden add-on charges midway through construction.
A thorough written proposal should clearly detail the removal and disposal of existing cladding, including haul-away fees and bin rentals. It should also state the per-sheet or hourly rate for repairing hidden rotted OSB or plywood if damage is uncovered after tear-off. Finally, confirm whether window casing trim, aluminum fascia, soffit vents, elastomeric caulking, and proper mounting blocks for exterior light fixtures and hose bibs are included in the base price.
6. Who Will Actually Be On-Site Supervising the Crew?
Many exterior companies use dedicated sales estimators to quote jobs and then hand the project over to a separate installation crew or third-party subcontractors. Neither business model is automatically a red flag, provided clear accountability stays in place from start to finish.
Ask who your daily point of contact will be once materials arrive on your driveway. Confirm whether a dedicated site supervisor inspects flashing, window wrap, and nailing patterns before the new siding covers up the underlying wall assembly. You should also ask how the crew handles daily site cleanup and magnetic nail sweeps to protect children, pets, and vehicle tires.
7. What Warranties Cover Both the Materials and Your Workmanship?
Every siding project carries two distinct warranties. Confusing them can leave you unprotected if problems appear years later. The manufacturer material warranty covers factory defects, premature fading, or delamination. Depending on the product tier, this coverage often lasts anywhere from 25 to 50 years.
The contractor workmanship warranty covers installation errors instead. These include issues like loose panels, leaking flashing, or buckled trim. Look for a contractor offering at least a five- to ten-year written workmanship warranty. Always verify how long the company has operated locally under the same business name. A long warranty means very little if the contractor disappears after two seasons.
Moving Forward With Confidence
Choosing the right siding contractor comes down to transparency, building-science know-how, and proven local reputation. By verifying insurance and manufacturer certifications, confirming moisture-management details, comparing itemized estimates, and reviewing recent neighbourhood installations, you can hire a crew that delivers crisp curb appeal and decades of reliable protection against harsh Canadian weather.